
Getting Started with Crypto Health – If you are already in VYVO and you need to set up your new Inpersona app, these will be step-by-step instructions for you. Furthermore, as like with anything that involves personal information, there is a process of setting up everything properly. Moreover, Crypto Health is going to be the new norm for keeping your health data secured through the Vyvo and Inpersona devices and programs. However, if this seems a bit confusing, get with the person that brought you into this opportunity to help you out.
It’s pretty straightforward and don’t skip any steps, this is as basic as it gets. Make sure your HELO Smart app is up to date. Then make sure your watch/band is charged before you update the firmware. Your watch/Band needs to be at least 25% charged. Then you will download the Inpersona app and stop there. You are ready to begin your journey to keeping your Decentralized Health Data safe and getting paid while using it.
Now let’s get you going with your own Helo Device and the ability to not only control your Health Data but be in a position to benefit from it. And, the healthier we become the more we can gain in rewards from the Socialfi and Healthfi aspects of this brilliant wave of the future.
This information is also up to date and available on the Inpersona.com Page Here
Firstly; This begins with you downloading the Free Inpersona App from the Apple Store or Google Play Store:
Get it on Apple Here:
Get it on Google Play Here:
Secondly; Now that you ave the App set up a New Account after you “Run” or “Open,” the app. Set up your account. And from here you will need an “INVITE CODE” which is available by us or anyone connected to the Inpersona App already.
Get Your Invite Code:
Because we are sharing this and growing this incredible wave of the future that not only solves a huge series of issues with our Health Data Sovereignty. Below are Invite Codes that are available.
If you want to earn some amazing crypto, then share this watch with others. It will help you stay healthy by allowing you to monitor your vitals, but it also allows you to earn crypto. Use PROMO CODE: PCA2BURC9 or PCB2BURC9 for a 10% discount at checkout!!!
Once you get your device you will need to get your Watch/Band set up properly.
It’s a win/win situation. You have nothing to lose and everything to gain. This is your own personal way to develop your crypto market without investing your own personal income. Build up your crypto portfolio with a device that you are most likely already wearing, a simple watch with a twist. It is a medical telehealth
Get Your Health Sensor Smart Device, Today!
If you get stuck or have any questions; Get in contact with me by Skype me at ccarrido3 or leave a message at (253) 260-3155 or email me at HomewithCatherine@gmail.com – Or I’ll be more than happy to help you set your Watch/Band set up.
Be sure to Bookmark this site. And, Register in the top right-hand corner. Furthermore, we’ll update you.
FOLLOW STEP BY STEP. DO NOT SKIP ANY STEPS OR YOU WILL GET LOST AND MIGHT NOT WORK.
Update HELO Smart App and Watch/Band Firmware Before Proceeding
iPhone
- Open the App store and click on your picture in the top right.
- Scroll down to where updates, are and either “Update All”, or find the HELO app and update.
- Your Helo Smart App should be on App version 2.21(6).
Android
- Open Google Play Store and click on your picture.
- Select Manage apps and devices.
- Under Overview, Updates available, “see details”.
- Find the HELO Smart app and update it.
- You should now be on App version 1.0.5.15
Updating your firmware for the device
- Open the Helo app and select the device at the bottom (you will have to wait until the upload is done).
- When on the device, scroll down to the bottom. Make sure your watch is fully charged.
- Select firmware upgrade. The upgrade will take a little while. Then your watch will turn off. Don’t select. “YES” until your watch turns back on and works properly
- Your firmware should be at 5.5.16.44
Download the Crypto Health App
This app is going to be out the main focus on everything for the devices and the business. We will be able to see how many tokens our Health watch or band is creating. Keep track of our wallet and NFT’s. Purchase more NFT’s and send our invite codes to others wanting in on the opportunity.
Now everything is updated, it’s time to download the Cypto Health App known as Inpersona onto your phone. This will be a turquoise app with a white heart, the right side of it has dots. To download it you can either go to inpersona.com on your phone and choose the link to whichever app store you have. Or you can open your app store and type in the search bar Inpersona. Now the app is downloaded open it up.
Steps To Setup Your Crypto Health App
Sign in to your Inpersona app and create your wallet.
- Use the same email and password that you used for Vyvo.com.
- Next you will “Create New Wallet”
- You can name the wallet anything you want, i.e. your first name and then wallet.
- There will be some reading and lines telling you how important it is to keep your passphrase and pin safe. Check the boxes and go to the next page.
- Then you will come to a page that has twelve worlds or passphrase. All the words will be XXXXX’s
- ****IMPORTANT**** Scroll down and hold down “reveal passphrase” and take screen shot, write it down in exact order (case sensitive). You must keep this safe and DO NOT give it to anyone else.
- Once you have written down your passphrase and tripple checked it, you can click NEXT.
- You will have to click the 12 words in order choosing the correct word from 3 random words.
- Now create an 8 digit PIN, again you need to remember this and NEVER forget it.
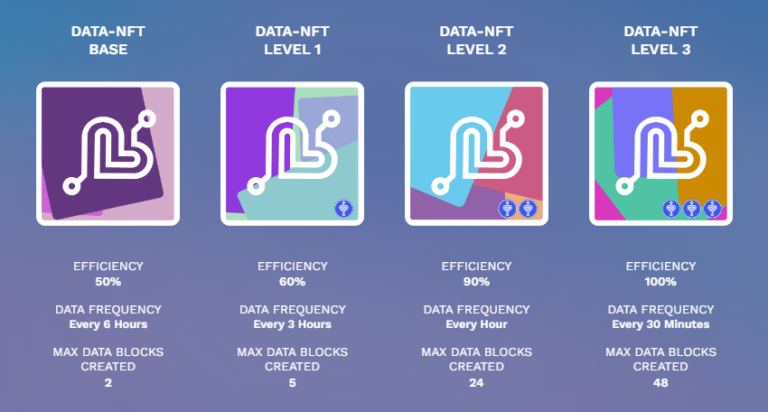
Getting your basic NFT
- Start by choosing the boxes down at the bottom left of the app and click on your name at the top left.
- In the list, choose “Vouchers & Promos”. Then click on the boxes on the right of the voucher to copy it. Arrow at the top left, hit that twice. (if you don’t have the voucher & promo option, sign out of the app and then back in, then start at 1.)
- Now choose the bottom circle/globe, it is the 3rd one from the left.
- If you have an iPhone, type m.inpersona.com should already be in the space so you just have to select “Go”.
- On the next page, you will have your NFT’s, start off by choosing the “BASIC” (on the left, $15.00).
- Scroll down and choose Buy Now
- On the next page, find where it says “Have a voucher” and choose that. Click in the box and paste the voucher code you copied in Step 2. Hit “APPLY”
- Scroll down again and “complete purchase” (the next page should say congratulations and your NFT is minting)
Once everything is done you can back out of this part of the app. The globe is like an internal internet to the Inpersona app. This next step could also take some time, your NFT might now show up right away.
Binding your NFT to your Crypto Health device
- Choose the boxes at the bottom, far left. Your NFT should show up there, this will look like the picture to the right.
- if your NFT is not there, first troubleshooting step will be to select the top right heart. Then choose a blockchain (polygon). If you still don’t have an NFT, choose the top left again. Then go back to Vyvo Smart Chain. If that doesn’t work, logout by selecting name and logout.
- If your NFT is there, select “Bind Your Device” (see picture), you will have to enter your 8-digit PIN
- Now the fun begins, DO NOT close out of your app but open your HELP app
- In the HELO app select the device at the middle bottom. At the top You will see the device name, connected and battery percent, and then MAC: address (a bunch of letters and numbers)
- You will need to copy the MAC address by selecting the little box on the right of it, NOW go back to your inpersona app
- Scroll down, there should be three boxes. The first box says Helo/Vyvo in it, Second box says Device MAC. In this box is where you will paste your MAC address.
- Now go back to the HELO app, and choose profile bottom right. Click on your email at the top.
- Under full name will be the UID number copy that by selecting the little boxes on the right.
- Now go back to Inpersona app, scroll down, and in the last box past the UID.
- Scroll down more and Bind to NFT.
You are done and ready to mine coins when the Founders Phase is up. Now if you want and are ready, let’s get you set up with the Level 3 NFT. This NFT will allow you to create more tokens, which in turn creates more money. It really is a no-brainer.
Setting up your Crypto Health Founders Edition NFT Level 3
This will be very similar to setting up your Basic, the only difference is you have to pay for it with either a debit/credit card or with crypto. We will start off with the easy part of using a debit/credit card. You should have no problem with it, the card has to be in your name and current address that the card is registered.
Getting Founders Edition NFT Level 3 (no longer available)
- Open the app and select the Circle/Globe bottom third from the left and go to m.inpersona.com by selecting “Go”
- Next, select the NFT Level 3 on the right $1500
- Scroll down and select Buy Now
- You will not have a Voucher, so select Continue
- Now you will select Credit Card and check the terms and conditions box, complete the purchase.
- This will take you to WERT Check out where you will enter your Mobile Number and send code to enter. (On this page you can also see if your state is supported)
Bind to NFT Level 3
- Once you have confirmed the purchase you can back out of the internet area of the app
- Go to the squares at the bottom left
- First, you will have to unbind your basic NFT. Meaning you need to click on the NFT and enter your PIN. Once the NFT opens up you will see “unbind”. Choose this.
- Now you will scroll over to your NFT Level 3 and select “bind your device”, you might have to put your PIN in again.
- Now the fun begins (AGAIN), DO NOT close out of your app but open your HELO app
- In the HELO app select the device at the middle bottom. At the top You will see the device name, connected and batter percent window, and then MAC: address (a bunch of letters and numbers)
- You will need to copy the MAC address by selecting the little box on the right of it, NOW go back to your inpersona app
- Scroll down, there should be three boxes. The first box says Helo/Vyvo in it, Second box says Device MAC. In this box is where you will paste your MAC address
- Now go back to the HELO app, and choose profile bottom right. Click on your email at the top.
- Under full name will be the UID number, copy that by selecting the little boxes on the right.
- Now go back to Inpersona app, scroll down, and in the last box past the UID.
- Scroll down more and Bind to NFT
If You Have Issues, Create a support ticket!
There are many different issues with the Crypto Health App that you could have. Remember this is a ground-floor business so there are bound to be some hiccups. Be patient and the wonderful support team will get everything resolved. It just takes time. Here is the first thing you will do…
- Click on your name at the top of the Inpersona app
- Choose “Help”
- Top right there will be three green lines (hard to see), select those
- Submit a Request
- You will enter your email (the one you signed in with), Subject, Description of issue, Support Language, priority (Optional), and if you have any attachments (i.e. screenshots, emails, etc.). Then choose Submit.
- Your support ticket could take some time to get to so please be patient. DO NOT submit another support ticket for the same issue you had.
Common issues we have seen
- Legacy members not seeing hubs after they got their Basic NFT (it will say Personal instead of legacy in the HealthFi & SocialFi tab on the bottom right) – SUBMIT A REQUEST
- Vouchers & Promos not showing up in the menu – Be patient, Logout and Log back in, Give this some time. If they never show up, SUBMIT A REQUEST.
- After getting NFT (either one), they don’t show up in Dashboard (squares bottom left) – Be patient, Logout and Log back in, Give them some time. If they never show up, SUBMIT A REQUEST.